How to Photograph Meteor Showers

Gear
Get a camera that can handle high ISO (Nikon or Sony full-frame cameras would be ideal)
Intervalometer (built-in or attachable).
Wide Lens and set your aperture wide open to capture more light.
A long lens will also work (just spend more time aiming near the horizon)
Extra batteries!
Tripod is a necessity.
Blankets are probably a good idea too… yea blankets and mats to lay on, get those. Or if you don’t want to watch then sleep in your tent/car/rv….
Location
Have all the gear? Ok, now go somewhere with low light pollution. To ensure you see the most meteors possible, go somewhere away from city lights and get atop a mountain if there is one near you, as this will minimize light pollution. The light pollution from a city (or the moon!) will drown out fainter meteors, so best to avoid that. As you can see in the image below, light pollution lowers the amount of stars you can see in the sky AND the meteors/hour rate.

Now set up your camera and take pictures all night. You can just set the intervalometer to shoot every few seconds (to allow time for the image to write to your SD card) and set the number of photos it takes as high as it can go. Be sure to check the camera every now-and-then because it will stop shooting if it outruns the buffer. Make sure it’s still in focus while doing this, the last thing you want to find out after a whole night shooting is that all of your photos were out of focus.
Framing
When picking a spot to shoot, having something in the foreground helps give a sense of depth. It is also probably a good idea to have the horizon in view, which gets you more meteors in frame. This is probably because there is literally more sky/atmosphere towards the horizon, making it more likely for a meteor to burn up there.
the Radiant point

An old diagram I made showing the radiant point for the Perseids in 2013
Pointing the camera at the radiant point is unnecessary. Meteors will burn up all across the sky, but more likely to do so where there is more atmosphere scooping up space dust (i.e. towards the horizon). Aiming the camera differently provides different effects. You can either face towards the radiant point (meteors will be coming at you), or away and it will seem like the meteors are rushing over your head away from you.
When the radiant point is higher in the sky, this is the optimal time to capture more meteors. This is the point at which more of the atmosphere (from your perspective) is scooping up space dust.
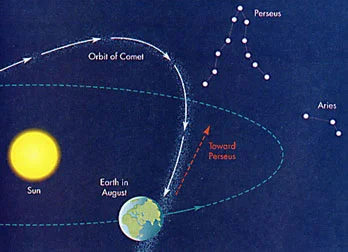
The illustration above shows how this works out. The space debris has its own orbit around the Sun and as we plow in to it, they burn up in the atmosphere and appear to come from a certain point (radiant point). Like how railroad tracks seem to converge, the same principle applies here. Some meteor showers have a narrow debris field meaning Earth will pass through it in a day, some are larger making the meteor showers last a few weeks. But with all meteor showers, you can’t see meteors unless you can see the radiant point. So the meteor showers visibility is dependent on your latitude on Earth.
Camera settings
ISO – Anything >3200. This will capture all the meteors that are bright enough to be worth your time in the photo. If using higher ISOs you might want to also decrease the shutter speed because if a meteor burns up at the beginning of the exposure, during the rest of the exposure the background is getting brighter and drowning out the meteor. Don’t go too high to avoid a grainy and less colorful image.
Aperture – Wide is typically better, to allow more light to enter the camera sensor. If your lens has bad coma you might want to stop the aperture down a bit for sharper images.
Exposure – 15 - 30 seconds. Keep in mind star trailing, how many photos you want to look through later and how bright the sky is depending on ISO and Aperture settings.
Quality – Shoot in RAW. Always.
Focus – Focus on city lights in the distance or a bright star/planet. Consider taping down the focus ring after it is set.
Now get out there and shoot! Wake up early / stay up late and don’t miss a show like this…